

Create your own cryptocurrency!
Create your own cryptocurrency!
It is easier than you think!

You received this email because you subscribed to Peter Till's newsletter via Gumroad, I will only send the newsletters from here because it is easier that way.
As inflation is rampant and Western governments are increasingly corrupt, more and more people are turning to cryptocurrencies as a form of payment. Of these, Bitcoin, Dogecoin and Ethereum are the most popular, but there are millions of other projects.
It is true that the market is a bit oversaturated, but there is still room for great crypto projects. And more importantly, the demand for blockchain and smart contract developers has become very high. I think this is a very good opportunity to learn a little about Ethereum and how blockchains work, even if you are not a software developer. In this newsletter, I will teach you the basics of smart contract development by creating your own cryptocurrency!
The statistics
✉️ Newsletter subscribers: 64
📷 Instagram followers: 391
📕 Medium audience: 432
Let’s get started!
What are we going to build?
Of course, we are not going to develop our own blockchain technology from scratch. That would be too much work and wouldn't fit in this newsletter. Instead, we will run our cryptocurrency on an existing blockchain, namely Ethereum. The best thing about it is that we don't have to deal with hosting, because we only alter the MATIC token on the Polygon network, so we create our own token. It is worth noting that tokens and coins are two separate things. The coin has its own blockchain technology, and the token builds on an existing one mainly using smart contracts.
Then you might ask, won't it be a full-fledged cryptocurrency then? It's a full-fledged cryptocurrency, but we don't have to worry about hosting and securing it. Exchange platforms also prefer tokens over coins because they cannot be modified after the contract is executed, thus protecting the holders.
Step 1 - Get to know the development environment and the programming language!
Don't worry, you don't need to download or install anything for this, you can solve it on an official interface in the browser! 😅
For the purpose of deploying the smart contract, we will use the Remix IDE (Integrated Development Environment), which can be found at this link: Remix IDE. You don't even need to create an account!
We will write the smart contract in the Solidity programming language, as it is one of the most common and official languages!💪
Now let's get to know the user interface a little!
There are icons on the side bar on the left side of the screen, there is a file icon, this opens the file manager!
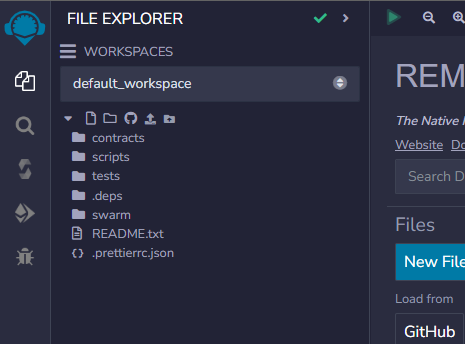
The files required for deployment and the files of smart contracts can be found here. Remix IDE automatically created a couple of these files for us..
You can compile the smart contract by clicking on the S-shaped icon. It's worth using version 0.8.19, because at the time of writing this newsletter, it was the only version I managed to produce on Polygon. It is important to note that the same version must be used in the smart contract file.
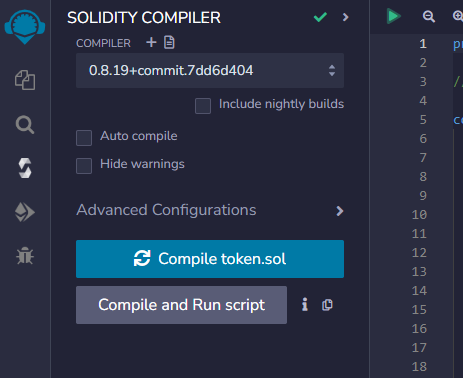
The compile button only appears if a valid smart contract file is open (.sol ending)
The last button on the sidebar that we need to deal with is what looks like the Ethereum logo. There we can deploy our token to Ethereum blockchains.
Step 2 - Create the smart contract file!
Navigate to the file manager and open the /contracts folder there! There you will see some Solidity files ending in .sol, but you don't need to deal with them. Create a file inside this folder called MyToken.sol! Paste the following code snippet into the file.
// SPDX-License-Identifier: MIT
pragma solidity ^0.8.19;

import "https://github.com/OpenZeppelin/openzeppelin-contracts/blob/master/contracts/token/ERC20/ERC20.sol";

contract MyToken is ERC20 {
    constructor(string memory _name, string memory _symbol) ERC20(_name, _symbol) {
        _mint(msg.sender, 200000000 * 10 ** 18);
    }
}
Now I will explain line by line what it does!
// SPDX-License-Identifier: MITThis line declares the license type for this contract. This is necessary, however, as an open source license, this does not mean that you have to make it open source.
pragma solidity ^0.8.19;With this line we declare the version of the Solidity compiler. We will have to select this from the drop-down list during the compiling process!
import "https://github.com/OpenZeppelin/openzeppelin-contracts/blob/master/contracts/token/ERC20/ERC20.sol";This line imports the ERC-20 standard methods from the OpenZeppelin source.
contract MyToken is ERC20 {
    constructor(string memory _name, string memory _symbol) ERC20(_name, _symbol) {
        _mint(msg.sender, 200000000 * 10 ** 18);
    }
}
This is the constructor of the smart contract itself, which will receive two values upon deployment. One is the name of our cryptocurrency, the other is the ticker symbol. This can also be considered as an extends class in Java. After that, within the constructor, we mint out of thin air and send 200 million of our own tokens to the Polygon address of the creator of the contract, which will be your address! 🤪
Step 3 - Compile the contract file!
Now we are ready to package the contract file. Open the Solidity Compiler panel by clicking on the S icon on the side!
Choose the right version (the one you specified at the top of the file) and press the big blue Compile button!
This operation was successful and we did not receive any errors, we can proceed to the next step!
Step 4 - Set up Metamask wallet!
First of all, install the Metamask wallet extension in your browser! Install Metamask wallet
After installation, follow the instructions to create a crypto wallet! It's completely free!
This is necessary because we need a crypto wallet from which we pay gas feet and receive our own tokens (all 200 million)
Don't worry, you don't need to buy crypto to pay the gas fee! We can use a faucet to get free MATIC crypto in exchange for answering a few surveys! I'll show you how in the next step!
Step 5 - Let’s get some cryptocurrency…
Unfortunately, the biggest disadvantage of tokens and smart contracts is the need for a gas fee, i.e. a fee in crypto, with which we pay the miners to validate our block that contains the smart contract. The price of the gas fee depends on the complexity of the functions to be run. Ours is just a simple token smart contract, so the fee cannot be too high. I have already run the smart contract that I shared with you, and this operation only cost me about 0.3 MATIC gas fee. 😎
But the question is... how do I get enough MATIC to pay for the gas fee without spending a cent? The solution is the faucet! Generally, faucets are sites where you can get cryptocurrency for completing small tasks, such as logging in daily, completing surveys, or watching ads!
But there is a little problem! There are a lot of scam sites that don't give crypto and sometimes even steal! Don't worry, there is a normal faucet site that I have already tried! I also got the gas fee needed for CodersCoin's ERC20 bridge token from here, plus I still have some MATIC to invest! The site’s name is FaucetCrypto.
It may seem fake at first, but if you reach level 7 with some difficulty, a survey tab will be unlocked, where you can fill out 2 questionnaires per day, usually for 2000-10000 coins! You can then convert these coins into crypto! You need around 1500 coins in order to withdraw your funds. I was also against the functionality of this because of the harsh appearance, but in the end I received my payment in MATIC. I collected 0.6 MATIC from here in about less than 3 days, which of course won't make you rich, but it's enough to pay the gas fee! That's the security amount I recommend for the successful deployment of our token!
Step 6 - Let's go to the moon!
At least now we have enough Polygon MATIC for gas fees! Now let's get back to Remix!
Go to the “Deploy and run transactions“ side panel, then select the “Injected Provider - Metamask” option.
In the deploy section, enter the name and ticker symbol of your token. The moment we've always been waiting for has arrived! Press the "transact" button! Metamask will start and ask you to accept the smart contract. In this case, approve it. In a few minutes, the smart contract will be live on the blockchain. Open the transaction directly from your Metamask wallet in polygonscan explorer, then copy the contract address. Go back to Metamask, click "Add Token Manually"! As soon as the wallet recognized your token and replaced the token symbol automatically, you got your own cryptocurrency in your wallet!
Congratulations on making your own cryptocurrency!🎉
Invite your friends to win useful stuff!
Would you like to win valuable prizes, such as a membership in my Discord server or a free ebook on the basics of Java programming? You don't have to do anything else, click the button, get your link and invite your friends to this newsletter!